树莓派简单NAS配置和SSH内网穿透
CyberSicko
hava a nice day.
树莓派搭建NAS Nginx配置 内网穿透开始远程SSH树莓派搭建NAS Nginx配置 内网穿透开始远程SSH
树莓派搭建NAS
我有一个移动硬盘,将移动硬盘路径通过Nginx映射出去,就可以得到一个简单的文件访问网页。
Nginx 配置文件说明:
    server {
            listen       8080;
            listen       [::]:8080;
            server_name  192.168.0.200:8080;
            root         /usr/share/nginx/html;
        charset utf-8;
            # Load configuration files for the default server block.
        location / {
            if ($request_filename ~* ^.*?\.(txt|pdf|doc|xls)$){
                add_header Content-Disposition attachment;
            }
            autoindex on;
                    alias /media/pi/disk/;

        }
        location ^~/学习资料/{
            if ($request_filename ~* ^.*?\.(txt|pdf|doc|xls)$){
                add_header Content-Disposition attachment;
            }
            auth_basic TEST-Login;
            auth_basic_user_file /etc/nginx/htpfile;
            autoindex on;
            autoindex_exact_size on;
            autoindex_localtime on;
            alias /media/pi/disk/学习资料/;
        }
            error_page 404 /404.html;
                    location = /40x.html {
            }

            error_page 500 502 503 504 /50x.html;
                    location = /50x.html {
            }
        }
这里的 alias /media/pi/disk/ 表示将/media/pi/disk/映射出去。
autoindex on; 表示开启目录列表功能。
  location / {
            if ($request_filename ~* ^.*?\.(txt|pdf|doc|xls)$){
                add_header Content-Disposition attachment;
            }
            autoindex on;
                    alias /media/pi/disk/;
        }
然后就可以得到这样的界面。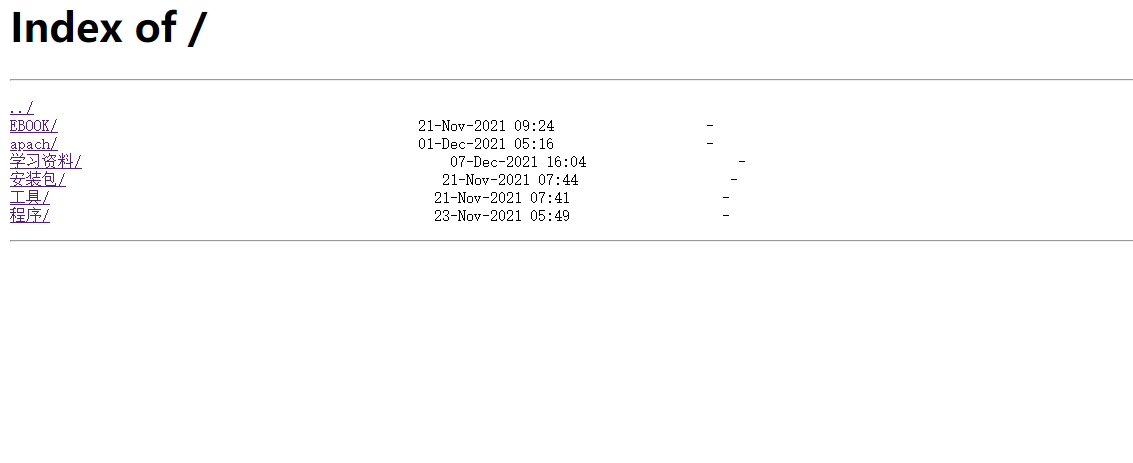
这里还有一个配置,就是学习资料下的目录我不想让任何人都可以看到,我想加上一个认证拦截,用Nginx的内置模块就可以实现。
    location ^~/学习资料/{
            if ($request_filename ~* ^.*?\.(txt|pdf|doc|xls)$){
                add_header Content-Disposition attachment;
            }
            auth_basic TEST-Login;
            auth_basic_user_file /etc/nginx/htpfile;
            autoindex on;
            autoindex_exact_size on;
            autoindex_localtime on;
            alias /media/pi/disk/学习资料/;
        }
之后再打开学习资料这个文件夹就会弹出验证框: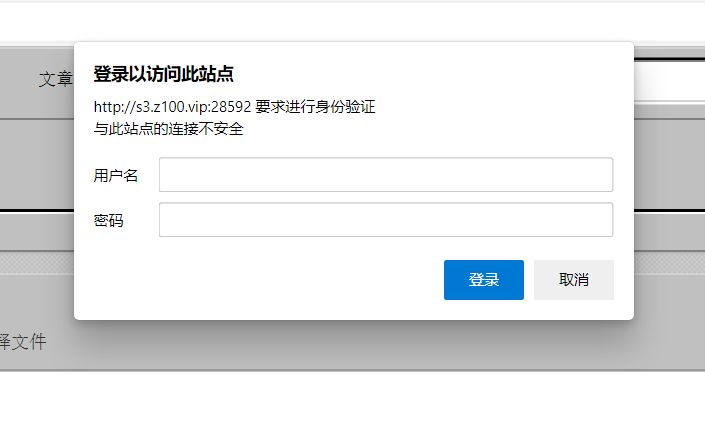
当路由匹配到学习资料会执行一个逻辑,request_filename 如果是 txt 等文件类型不用浏览器打开,直接下载。
auth_basic TEST-Login;
auth_basic_user_file /etc/nginx/htpfile;
表示开始登录拦截,并指定用户名密码的文件。
用户名密码的文件可以用 apache-tools htpasswd 来创建,密码是加密的。
yangchaojie:{SHA}PiEmk9fh/PS+T+DymG/I/2s9aBM=
格式为,用户名:密码。
内网穿透22端口远程SSH
首先开启ssh。
sudo /etc/init.d/ssh start
然后防火墙开启22端口。
ufw allow 22
然后映射出去就可以用ip:端口方式远程控制树莓派了。
评论
还没有评论